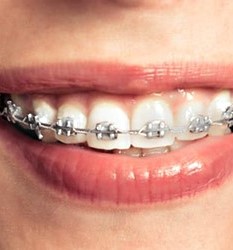


The importance of caring for your teeth during your time in braces cannot be stressed enough. Keeping your braces clean will minimize your chances of developing unsightly white spots around your brackets, and will reduce the risk of cavities or gum irritation around the teeth that could slow treatment rates.
When the orthodontist applies your braces, he will provide a detailed guide on how to care for your teeth and keep them clean. Here are some items your orthodontist might suggest—or insist—that you use to clean your braces.
You might be tempted to go for the most inexpensive toothbrushes while you are wearing braces, as the metal and wire will wear out the toothbrush. However, it is important to use a high-quality toothbrush while you have braces. (But ask your orthodontist for his recommendation before purchasing a new type of toothbrush or changing your routine.)
An electric toothbrush can be a great option for getting your teeth clean while in braces. However, the duration of brushing and mechanics of using an electric toothbrush are not different from a manual brush, so don’t purchase an electric toothbrush with the intention to cut corners.
Electric brushes come in a variety of styles with different appliances, so your orthodontist can help you make the best decision about what brush is right for you. Battery-powered toothbrushes usually run on AA batteries, and rechargeable models usually feature a base that plugs into an outlet in the wall. Battery-powered toothbrushes are a cheaper option, typically ranging between $5 and $25, while rechargeables can range anywhere from $50 to $300.
Electric toothbrushes offer many features, such as timers, pressure sensors, travel cases, multiple brush heads and adjustable settings. Typically the cost will be higher with a larger number of features. Decide which of the available brush features are most important to you. If you have never used an electric toothbrush, it might be best to start with an inexpensive model so that you can see if you prefer this method of brushing.
Manual, soft toothbrushes also work just fine to clean the areas around your brackets. However, many professionals recommend the orthodontic cut, where the bristles are in a subtle “V” shape, with the middle bristles being lower than the outer bristles.
 Before brushing, rinse your mouth with water to dislodge any food particles that are stuck to your braces. Make sure to swish for about 30 seconds. Also rinse your toothbrush before adding toothpaste, as this will shed debris and bacteria that may have lingered after your last brushing.
If you’re unsure which toothpaste to choose, here is a list of ADA-accepted toothpastes.
Your mouth has four quadrants, and you should spend at least 30 seconds dedicated to each. The division on each side is from your first central tooth to your last molar. When brushers take the “all at once” approach, they are likely to miss key areas.
Your instinct might tell you that the harder you brush, the cleaner your teeth will get. This is not necessarily true. In fact, brushing over your braces too hard could damage the brackets or wires. Some higher-end electric models will come with a sensor feature that shuts down if it detects too much force.
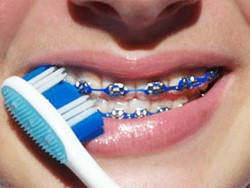
While you brush, make sure you hold your toothbrush in the proper position—at a 45-degree angle, above the gum line. Brush the outer surfaces of your teeth and braces, remembering to scrub around each bracket and over its surfaces. Pay special attention to the back teeth, as these harder-to-reach molars are more prone to cavities.
Using the same angle, brush the backs of your teeth that face your mouth and throat. Pay most attention to brushing down at the gumline, as this is where most tartar builds.
Brush the biting portions of your teeth too. These are the tops of the teeth that you actually use to bite into food. Use a more circular motion that reaches around to the back of the tooth to clean all of the biting surfaces.
Once you’ve completing a routine brushing, concentrate on the spaces between your braces. Insert the bristles from the top in between your braces and give each space a few solid strokes. Then insert the bristles from the bottom and do the same. (If using an electric toothbrush, you might not be able to complete this step while the brush is running. The spinning of the bristles could cause them to get stuck in the wires. Simply turn off the electric feature for this step and use the electric brush manually.)
Finally, you need to rinse your mouth after every brushing. This will flush away all the particles of debris that are now dislodged around your mouth. Most dentist recommended brushing the teeth twice per day. Depending on your situation and treatment plan, your orthodontist might recommend more brushings over a 24-hour period. This video shows one way to go through the complete brushing process with braces.
You will need to replace the bristles of your toothbrush every month or two. For a manual toothbrush that will mean purchasing a new one, and for an electric brush the head will need to be swapped. It always is a good idea to have extras on hand. You don’t want to keep brushing with a toothbrush that no longer does its job, and overnight guests who forget their toothbrushes will definitely appreciate a spare.
 Unfortunately, flossing can be more of a challenge while wearing braces. But that doesn’t mean you can skip it. Experts say that regular flossing is as essential as brushing. Too many people make the mistake of thinking their dental hygiene is “good enough” because they brush their teeth regularly. But because a toothbrush cannot reach the plaque between your teeth, tooth decay and gum disease may develop in those areas.
You will likely need a strand of floss that is at least a foot long. You want to try to not reuse any part of the strand, but if that is not possible make sure to rinse the floss thoroughly before re-applying it.
Carefully thread the floss under or over the main wire, and pull it through so there’s enough slack on either end to grab it. Wrap the floss around the ends of your fingertips so that a tight strand forms between them. Gently push the floss down into the crease between your teeth, then slide it down into the gap. This will be easier or more difficult depending on the spacing between each set of teeth. Just make sure to take your time and do not thrust the floss down into your gums.
Slide the floss up and down the side of each tooth and down into the gum to the point where it no longer moves but does not cause pain or bleeding. You want to use a scrubbing motion to remove the plaque from each side of the tooth. To remove the floss, just grab one end and slowly pull it through, as you will not be able to lift it over your wire.
If you are having difficulty getting the floss under your wires, consider using a floss threader—a flexible piece of thin plastic with a large loop at the end. This utensil allows you to put your floss through the loop and pull the threader up and under the wire. Another option is a floss pick, which holds a small piece of floss together between two prongs. The end of the handle also comes with bristles you can use to clean your brackets.
Your orthodontist may have recommend a type of dental floss, but in general waxed floss is easier to use with braces because it is less likely to get stuck. This video takes you through the process of flossing with braces.
A water flosser—the most common brand being Waterpik—is a popular alternative to traditional dental floss, and is often recommended for braces-wearers because it eliminates the hassles of maneuvering floss around your wires and brackets.
A water flosser is a hand-held device that you fill with warm water that streams out of a specialized tip. To use, simply trace it around your gum line. The pulse rate of the emitted water removes food particles and plaque very similarly to dental floss.
Water flossers come in rechargeable and battery-operated models, and have a variety of tips to choose from. Determining the right one for you will depend on what feels more comfortable, along with what your orthodontist recommends.
Another option for people wearing braces—and everyone else—is known as a spiral dental, or interdental, brush. This is small, hand-held device contains a wire with bristles—available in a variety of sizes—designed to fit between the teeth. This essentially allows you to brush between your teeth. Because you insert them at the gumline, they are a convenient way around that pesky archwire.
A rubber-tip gum massager—or gum stimulator—is a dental tool you may have seen at your past visits to the office. It looks like a slim metal rod in the shape of a number “7,” wearing a pointed rubber cap on the end. The rubber tip has a fine point that wedges between each tooth at the gumline, helping to nudge out stubborn debris that flossing left behind.
The good news is that you don’t have to be a dental professional to use this appliance. It is relatively inexpensive—about the cost of a morning latte—and can really help your hygiene goals while in braces (and after).
Place the gum massager under warm water for a few seconds to soften its tip. Then carefully run it along the gum line, going slightly between each tooth. Do not try to jam the tip between your teeth—its job is to break up debris right at the gumline. This appliance is NOT a substitute for flossing.
After you’ve run the gum massager across your entire gum line—top and bottom—follow with a full rinse. You may even start to notice your teeth whitening in areas that are difficult to floss, because you are now removing an additional layer of plaque you were missing before.
 When you think of oral hygiene, your teeth and gums are probably what comes to mind. But there is a large part of your mouth that people too often ignore, and that’s the tongue. In fact, if you’re suffering from halitosis (bad breath) half your problem could be coming from your tongue alone.
Monday to Saturday:
05:00 pm to 09:00 pm
Sundays: Closed
Follow us on Instagram to know latest techniques and technological updates in Dentistry. You can connect us instantly from anywhere anytime....